


 Achy Muscles
 Arthritis, Bursitis & Tendonitis
 Back Pain
 Fibromyalgia
 Foot & Lower Leg Pain
 Joint Pain
 Knee Pain
 Neck Pain
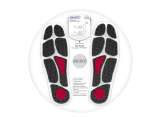
When pain is impacting your daily life, finding effective relief becomes a priority. According to the CDC, in 2023, 24.3% of adults experienced chronic pain, and 8.5% of adults had chronic pain that frequently limited life or work activities (referred to as high-impact chronic pain) in the past 3 months.
You've already taken an important step in pain management by choosing a TENS device—a drug-free approach that helps provide pain therapy right at home. Now, it’s time to put it to use and a key step to getting the most benefit from any TENS device is proper electrode placement.
Without the proper placement, you may not get the results you're hoping for simply because they aren't sure about the best placement for their needs. So, let’s make sure you’re setting yourself up for success—and maximum pain relief.
Getting started: Setting up for success
Before using your Transcutaneous Electrical Nerve Stimulation (TENS) device, let's get ready for the best possible relief experience. Just like setting up any health routine, proper preparation helps you get the most benefit from your device.
Start with clean, dry skin. A quick wash with mild soap and water is all you need—this helps ensure your electrodes make good contact and stay in place throughout your session.
Take a moment to check your electrodes' condition. They should feel sticky and adhere well to your skin. If they've lost some stickiness, don't worry—we have tips to help restore them. Fresh, properly maintained electrodes help ensure you get consistent relief during each session.
DR-HO'S electrodes are designed to work effectively on all skin types, so you can focus on finding the right placement for your needs. Our unique 4-in-1 solution combines TENS, EMS, and NMES technology with our innovative AMP Technology and helps deliver consistent relief when the electrodes are positioned correctly. The device can be used to treat:
-
Chronic pain conditions
-
Muscle spasms and cramps
-
Joint discomfort and stiffness
-
Sports-related injuries
-
Post-operative pain management
-
Arthritis and rheumatoid conditions
-
Temporary relief from daily activities
-
Post-exercise muscle recovery
Having the right tools makes all the difference when it comes to pain relief. Your DR-HO'S TENS device uniquely combines four technologies in one (TENS, EMS, NMES and AMP Technology) to help provide relief right where you need it. As the only pain relief device endorsed by the American Chiropractic Association and cleared by the FDA, you can trust that you're using a device designed with your comfort in mind.
TENS electrode placement guide for common areas
Let's understand how proper placement of the electrode pads helps your device work effectively.
Think of it like positioning a spotlight—when aimed correctly, it illuminates precisely where you want it to. Similarly, correct electrode placement determines the path of electrical impulses and helps direct relief to the areas that need it most, which is why placement is crucial to your pain relief journey.
Let's explore electrode placement for different types of discomfort starting at the top and working our way down.
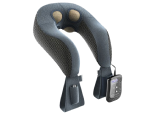
1. For headaches, neck and shoulder pain
Daily activities like reaching overhead, desk work, or carrying bags can affect shoulder and neck comfort. To relieve pain in the shoulders use four smaller pads total:
-
Place two pads at the base of the neck
-
Place two pads on your shoulders
-
Note: For effective treatment, lay on your back with your neck supported by a by a pillow, neck roll, or rolled-up towel

2. Shoulder pain (frozen shoulder or rotator cuff injuries)
A rotator cuff injury and a frozen shoulder (adhesive capsulitis) are two common shoulder conditions.
Rotator cuff injuries may be caused by:
-
Overuse from repetitive shoulder motions (e.g., in sports or certain occupations)
-
Acute trauma, such as a fall or lifting something heavy
-
Age-related degeneration, where tendons weaken over time
Frozen shoulder is a condition where the shoulder joint becomes stiff and painful due to thickening and tightening of the capsule (the connective tissue surrounding the joint), restricting movement. It may be caused by:
-
Shoulder immobilization due to surgery or injury
-
Associated with conditions like diabetes or thyroid disorders
-
Idiopathy (no clear cause in some cases)
To treat either, we recommend using two large pads:
-
Place one pad in the front of the shoulder and one at the back.

3. Elbow pain
Whether from computer work, sports injury, lifting objects, or other daily activities, elbow pain can make simple tasks challenging. In general, we find there are two types of elbow pain that people commonly get. For both you’ll want to use two larger pads:
-
For something like golfer’s elbow: Place two pads on the inside of your arm—one closer to the elbow, one closer to the wrist
-
For something like tennis elbow: Flip your arm over and place the two pads on the outside—one up by the elbow, the second closer to the write
-
Note: The pads should not be directly over the actual joint (i.e. on the elbow or wrist bones)

4. Wrist pain
Many people experience discomfort in their wrists and hands (also known as carpal tunnel syndrome) from repetitive daily activities like typing, using a mouse, or detailed handwork. To help manage this type of pain use two smaller pads:
-
‘Sandwich’ the wrist between the two pads, i.e.
-
Place one small pad on top of your wrist
-
Place the other small pad on the opposite side, on the inside of your wrist
5. Hand pain
Hand pain can result from various causes, including:
-
Arthritis
-
Carpal tunnel syndrome
-
Tendonitis
-
Trigger finger
-
Overuse or repetitive strain injury
A TENS machine may help relieve discomfort in some cases. Using two pads:
-
Place one pad on top of your hand
-
Place the other pad on the other side
-
Note: It is important to remember that you never want the pads to touch

6. Hip pain
Sitting for long periods, arthritis, walking, or daily movements can contribute to hip discomfort. To help manage this, we recommend using two large pads to ‘surround’ the joint:
-
Place one large pad on the front of the hip
-
Place one large pad on the back of the hip
-
Note: Ensure you use the larger pads here as this is a bigger muscle

7. Lower back pain
Low back pain is a widespread health issue affecting millions of people globally. Indeed, in 2020, an estimated 619 million people (10% of the global population) worldwide experienced low back pain (The Lancet).
To help relieve lower back pain, opt for two large pads and place them as follows:
-
Place the pads vertically and parallel to each other, on either side of the spine
-
Notes:
-
Leave at least a one-inch gap between the two pads
-
Do not place the pads directly on your spine

8. Radiating leg pain
Radiating leg pain, such as sciatica, occurs when pain starts in one area (commonly the lower back) and travels down the leg. It is often caused by irritation or compression of nerves, particularly the sciatic nerve, which is the largest nerve in the body. For relief, use four large pads and place them as follows:
-
Place two of the pads vertically and parallel to each other, on either side of the spine (same as the lower back pain placement above)
-
The other two pads should be placed on each buttock
-
Note: You can also combine these placements with the thigh placements in the next section

9. Thigh pain (including hamstring pain)
The thighs have a large surface area and many important muscles. Pain can manifest for many reasons (including sciatica, which we covered in the previous section). For thigh pain, you have a few options:
Either:
-
Use two large pads on the front of the thigh to specifically target the thigh muscle
Or, for hamstring or sciatica pain:
-
Use two large pads on the back of the leg
-
One pad on the buttocks muscle
-
One on the hamstring

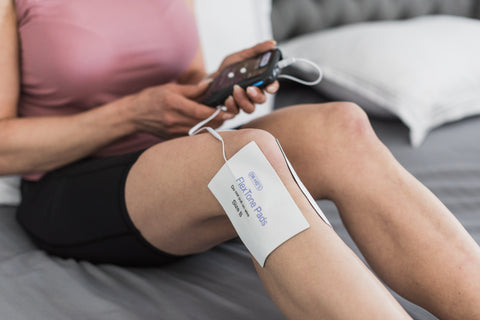
9. Knee pain
Walking, injuries, climbing stairs, or extended periods of sitting can affect knee comfort. For knee electrode placement, we recommend ‘sandwiching’ the knee with the large pads:
-
Place a large pad on either side of your knee
-
Note: The pads should not be directly over the actual kneecap

10. Shin pain
Shin pain can also be caused by a range of reasons, including:
-
Delayed onset muscle soreness (DOMS) after intense physical activity
-
Tendonitis
-
Shin splints (medial tibial stress syndrome)
-
Muscle strain
Those seeking pain relief from these and other causes of shin pain may find a TENS device can help. Using two large pads:
-
Place the pads vertically along the side of the affected leg
-
Note: The two pads should be about an inch apart so they don’t touch each other

11. Calf pain
For pain in the calf (or the back of the lower leg), we recommend again using two large pads:
-
Place each pad vertically on either side of the calf muscle—one on the outside one on the inside
-
Note: The two pads should be about an inch apart so they don’t touch each other on the back of the leg

12. Ankle pain
Ankle pain can stem from injuries, overuse, or medical conditions. It may be a ‘twisted’ ankle, tendonitis, plantar fasciitis, Achilles tendinopathy, or more. Ankle pain can also be caused by footwear, flat feet, or overpronation.
For ankle pain, we recommend wrapping two large pads around the foot and ankle:
-
One pad will go around the outside of the ankle
-
One pad wraps around the inside of the foot
-
Note: For hands and feet, you may find the pads do not stick as well due to the oils in these areas. You can hold the pads in place or sit to minimize movement.

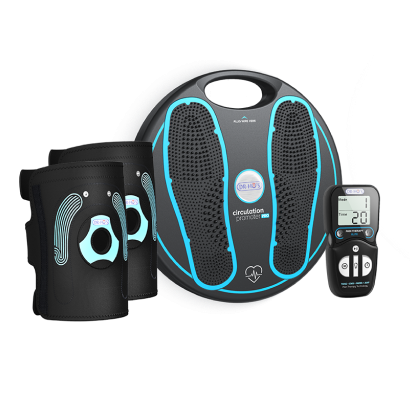
13. Pain in the bottom of the feet
We recommend using our Circulation Promoter base plate for pain in the bottom of the feet, such as plantar fasciitis, or for circulatory issues, like neuropathy.
Important safety reminders and best practices
Your DR-HO'S TENS device is FDA-cleared and designed with your safety in mind. Like any health device, following some basic guidelines helps ensure you get the most benefit from your sessions. These common-sense precautions are simple to follow and help you use your device effectively:
-
Always start with your device turned off when placing or adjusting electrodes
-
Always use two pads of the same size to treat any area
-
Spray the pads with water before and after each use
-
In general, you never want the pads to touch
-
Begin with the lowest-intensity setting
-
Never remove electrodes while the device is running
-
Ensure electrodes are making good contact with clean, dry skin
-
Replace electrodes when they begin losing their adhesive quality
Areas to avoid
While your DR-HO'S device is designed to help provide relief, certain areas should always be avoided when placing electrodes:
-
Eyes or surrounding area
-
Mouth
-
Front of the neck
-
Irritated or broken skin or wounds
-
Any areas with tumors
-
Directly over the spinal column
Special considerations
-
Do not use while pregnant
-
If you have cardiac concerns, consult your healthcare provider before use
-
Do not use with a pacemaker or similar device
-
Always remove jewelry or metal objects from the area where you'll be placing electrodes
-
If pain persists, worsens, or is accompanied by other concerning symptoms (e.g., swelling, redness, fever, or numbness), consult a healthcare provider to identify and address the underlying cause.
Remember that everyone's experience with pain is unique. These electrode placement guidelines are meant to help you get started with your DR-HO'S device. For personalized guidance and pain treatment based on your specific needs, consider consulting with your healthcare provider.
Living better day by day: A practical guide
While proper electrode placement is key to success, timing your sessions strategically can help you get the most relief throughout your day. There's no need to “persevere through the pain” and wait until you get home to seek relief—your DR-HO'S device is designed to help you manage pain wherever life takes you.
Finding *your* unique relief schedule
Many people experience more discomfort at certain times, like early morning when the body is waking up or in the evening when trying to relax. The beauty of your DR-HO'S device is its flexibility—you can seek relief when and where you need it most:
-
Morning sessions: Start your day on the right note. Many users find a session during their morning routine helps them prepare for the day ahead. Try using your device while enjoying breakfast or getting ready.
-
Throughout your day: Don't feel you need to push through discomfort. Your DR-HO'S device's discreet design means you can use it while:
-
Working at your desk
-
Taking a break during errands
-
Relaxing at lunch
-
Evening relief: After a full day of activity, take time to help manage any discomfort that's built up. Whether you're watching TV, reading, or spending time with family, your device can help you unwind and enjoy your evening.
Remember, everyone's experience with pain is unique, and your relief needs may vary from day to day. Your DR-HO'S device offers the flexibility to adjust your treatment schedule to match your lifestyle and specific needs.
The key to success with your DR-HO'S device is integration into your regular routine. Start with shorter sessions of 15-20 minutes, gradually finding the duration that works best for you. Many of our customers find that consistent, planned sessions help them maintain their active lifestyle better than sporadic use.
Store your electrodes on the provided protective film after each use to maintain optimal performance. If adhesive begins to decrease, a few drops of water can help restore it—but remember, less is more. Keep your device in a cool, dry place, and always check electrode condition before use.
Conclusion: Your path to taking control of your pain
With proper electrode placement and consistent use, a TENS unit can become an integral part of your daily comfort routine. Whether you're looking to stay active, maintain your work schedule, or simply enjoy your favorite activities, proper electrode placement helps you get the most from your device.
Looking to learn more about managing your comfort levels? Visit our website for additional resources, or reach out to our customer care team. We're here to help you live life on your terms, with less focus on discomfort and more focus on what matters to you.
Remember, your DR-HO'S device is more than just a wellness tool; it's your partner in maintaining an active, fulfilling lifestyle. By following these placement guidelines and making the device part of your daily routine, you're taking a step toward better days ahead.
Disclaimer: DR-HO'S content is intended for informational purposes only and should not be taken as medical advice. Please consult a certified medical professional for diagnosis and treatment recommendations.
More FAQs
How do TENS machines work?
A TENS unit helps provide pain relief through a gentle process that works with your body's natural responses. When you use your DR-HO'S device, it sends tiny electrical pulses through the electrodes placed on your skin. These pulses help interrupt pain signals traveling to your brain while encouraging your body to release its natural pain-fighting compounds.
Think of it like changing the channel on your body's pain response. The TENS therapy helps redirect your attention from discomfort, allowing you to focus more on the activities you enjoy. Our proprietary AMP technology, which is FDA-cleared and endorsed by the American Chiropractic Association, helps deliver these pulses in a way that’s designed for optimal relief.
Can I use my TENS unit every day?
Yes, your DR-HO'S TENS unit is designed to provide relief as part of your daily wellness routine. Many of our users incorporate sessions throughout their day to help manage discomfort and stay active. Listen to your body and adjust your usage to match your needs—whether that's a morning session to help start your day, quick relief during work, or evening relaxation. The key is finding a routine that works best for you.
What settings should I start with?
Start low and go slow—that's the best approach with your DR-HO'S device. Begin with the lowest intensity setting and gradually adjust until you feel a gentle sensation that's comfortable for you. Our proprietary AMP technology is designed to help provide relief at various levels, so there's no need to use settings that are higher than what feels right for you. Remember, the right setting is the one that helps you feel comfortable while using the device.