In 2020, an estimated 619 million people globally experienced lower back pain—nearly 1 in 13 people—with projections indicating this number will surge to 843 million by 2050 (The Lancet).
In the United States alone, 65 million Americans have experienced recent back pain episodes, with 39% of adults reporting back pain in the previous three months (Georgetown University). This staggering prevalence makes lower back pain the leading cause of years lived with disability worldwide.
For people worldwide struggling with this pervasive condition, a TENS machine (Transcutaneous Electrical Nerve Stimulation) offers a scientifically validated, noninvasive approach to pain management. By delivering precisely controlled electrical stimulation that works harmoniously with your body's natural nerve pathways, TENS therapy can provide temporary relief while supporting healthy muscle function and circulation. However, understanding proper TENS pad placement becomes crucial to effective pain relief.
What are the different types of back pain?
Lower back pain manifests across a spectrum of severity and duration, each presenting unique management challenges:
-
Acute lower back pain develops suddenly and typically resolves within days to weeks. Common triggers include muscle strains from lifting, sudden movements, maintaining poor posture during daily activities, or menstrual cramping that radiates to the lower back region.
-
Chronic lower back pain persists beyond 12 weeks, often stemming from degenerative conditions such as herniated discs, spinal stenosis, osteoarthritis, or degenerative disc disease. This affects approximately 16 million adults (8%) in the United States with persistent symptoms (Georgetown University).
-
Mechanical back pain accounts for up to 84% (Physopedia) of cases and results from structural issues, including muscle spasms, ligament strains, or joint dysfunction.
Key risk factors contributing to back pain
Research identifies several primary contributors to the growing lower back pain epidemic:
-
Occupational factors, including repetitive lifting, prolonged sitting, and physically demanding work
-
Smoking, which impairs circulation and tissue healing
-
High body mass index (BMI), placing additional stress on spinal structures
-
Aging populations experiencing natural degenerative changes
How does DR-HO’S TENS therapy help back pain?
TENS therapy delivers gentle electrical impulses through your skin to help reduce pain signals traveling to your brain. This scientifically validated approach encourages your body's natural pain management processes by stimulating the release of endorphins, your body's own pain-relieving chemicals.
The therapy also promotes improved muscle function and increased local blood circulation, which can help reduce tension and support the healing process. Unlike pharmaceutical approaches, TENS therapy is non-invasive and works harmoniously with your body's existing nerve pathways to provide temporary relief.
DR-HO'S advanced 4-in-1 AMP technology elevates this proven approach by combining TENS with EMS and NMES therapies.
Understanding DR-HO'S advanced electrode system
DR-HO'S gel body pads work seamlessly with our 4-in-1 technology, delivering precise electrical stimulation that encourages optimal nerve and muscle interaction while supporting healthy circulation patterns. You have two sizes to choose from:
-
Large Gel Body Pads: Engineered specifically for larger muscle groups like the lumbar region, these highly-conductive pads provide optimal surface area for effective stimulation of the lower back's complex muscle networks.
-
Regular Gel Body Pads: While designed for smaller areas, these precision pads can target specific trigger points or localized areas of discomfort within the lower back region.
Where do you place TENS pads for lower back pain?
Proper placement of electrode pads is critical for maximizing the therapeutic benefits of DR-HO'S advanced stimulation technology, as precise positioning allows our AMP Technology to deliver its full spectrum of TENS, EMS, and NMES patterns directly to the targeted nerve and muscle pathways.
Watch these videos to learn more!
For general lower back pain (L4-L5 Region)
-
Thoroughly clean and dry the lower back area
-
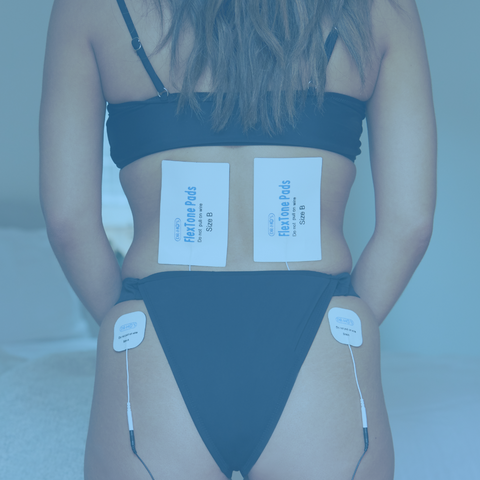
Position one large pad on each side of the spine, approximately 2-3 inches lateral from the center line
-
Align pads horizontally at the level of maximum discomfort
-
Maintain minimum 1-inch separation between pads
-
Ensure clear electrical pathway between electrodes
For localized lumbar pain
-
Identify the primary pain epicenter
-
Place pads in a "bracketing" formation surrounding the painful area
-
Avoid direct placement over the spinal column
-
Maintain proper pad spacing and linear electrical pathway
For sciatic pain (radiating symptoms)
Sciatic pain is a specific type of nerve pain that radiates along the path of the sciatic nerve, which runs from the lower back through the hips and buttocks and down each leg, typically affecting only one side of the body. This sharp, shooting pain can range from mild discomfort to severe, debilitating pain that may include numbness, tingling, knee pain or muscle weakness in the affected leg.
-
Position one pad at the lower back near the pain's origin (typically L4-S1 region)
-
Place the second pad along the nerve pathway—hip, posterior thigh, or calf area
-
Follow the anatomical path of sciatic nerve distribution
-
Avoid placement over bony prominences or joint spaces
For chronic pain conditions
Utilize the "crossing" method for deep-seated discomfort:
-
Position pads in a diagonal pattern across the affected area
-
Ensure electrical currents intersect over the primary pain region
-
Adjust placement based on individual response and comfort
Advanced usage strategies
When you begin your DR-HO'S therapy session, you'll experience a gentle tingling sensation as our advanced 4-in-1 technology delivers precisely calibrated electrical stimulation that works harmoniously with your body's natural nerve pathways to encourage optimal therapeutic response.
Utilize your device as part of a structured daily pain management routine. DR-HO'S advanced stimulation technology delivers over 300 different patterns that work with your body's natural processes to maintain therapeutic effectiveness.
Maintain a detailed therapy log documenting pad placements, intensity levels, and symptom responses to identify your optimal treatment parameters. This helps you understand how the nerve and muscle interaction responds to different approaches.
Essential safety protocols and medical considerations
Your DR-HO'S TENS device is FDA-cleared and designed with your safety in mind. Like any health device, following some basic guidelines helps ensure you get the most benefit from your sessions. These common-sense precautions are simple to follow and help you use your device effectively:
-
Always start with your device turned off when placing or adjusting electrodes
-
Always use two pads of the same size to treat any area
-
Spray the pads with water before and after each use
-
In general, you never want the pads to touch
-
Begin with the lowest-intensity setting
-
Never remove electrodes while the device is running
-
Ensure electrodes are making good contact with clean, dry skin
-
Replace electrodes when they begin losing their adhesive quality
Body areas to avoid
While your DR-HO'S device is designed to help provide relief, certain areas should always be avoided when placing electrodes:
-
Eyes or the surrounding area
-
Mouth
-
Front of the neck
-
Broken or irritated skin, or wounds
-
Any areas with tumors
-
Directly over the spinal column
Special considerations for using TENS
-
Do not use while pregnant
-
If you have cardiac concerns, consult your healthcare provider before use
-
Do not use with a pacemaker or similar device
-
Always remove jewelry or metal objects from the area where you'll be placing electrodes
Remember that everyone's experience with pain is unique. These electrode placement guidelines are meant to help you get started with your DR-HO'S device. For personalized guidance and pain treatment based on your specific needs, consider consulting with your healthcare provider.
TENS device maintenance and care
-
Store gel pads on provided plastic sheets in cool, dry conditions
-
Clean electrodes gently with a damp cloth, avoiding harsh chemicals
-
Replace pads when adhesion diminishes or conductivity decreases
-
Use protective storage when not in active use
How does DR-HO'S revolutionary 4-in-1 technology work?
A Transcutaneous Electrical Nerve Stimulation (TENS) machine offers a non-invasive, drug-free approach to managing and relieving pain and tension. TENS therapy works through several mechanisms to help release tight muscle knots and restore healthy muscle function.
DR-HO'S devices take TENS therapy to the next level by combining four powerful technologies into our AMP 4-in-1 Technology:
-
TENS (Transcutaneous Electrical Nerve Stimulation): Sends low-voltage electrical impulses through your skin to stimulate sensory nerve endings and disrupt pain signals before they reach your brain, providing immediate relief.
-
EMS (Electrical Muscle Stimulation): Causes muscles to contract and relax rhythmically, which can help release tight knots and improve blood circulation to the area.
-
NMES (Neuromuscular Electrical Stimulation): Targets specific nerve pathways to stimulate muscle contractions, helping to re-educate muscles that have become dysfunctional.
-
Auto-Modulating Pulses: Our proprietary innovation that enhances the delivery of electrical stimulation, helping penetrate deeper into tissue for more effective relief.
When these technologies work together, they can help:
-
Interrupt pain signals, providing immediate comfort
-
Increase blood flow to the affected area, bringing oxygen and nutrients needed for healing
-
Release tension in contracted muscle fibers
-
Stimulate the production of endorphins, your body's natural pain relievers
-
Reduce inflammation around trigger points
-
Restore proper muscle function through gentle, rhythmic contractions
What are some other things you can do to help with back pain?
While DR-HO'S advanced 4-in-1 technology provides effective temporary pain relief, integrating additional evidence-based strategies when you use a TENS unit may enhance your comprehensive pain management approach:
-
Targeted physical activity: Research supports gentle stretching, walking, and core stabilization exercises for maintaining spinal mobility and preventing future episodes. The improved circulation from DR-HO'S EMS therapy can complement these activities.
-
Thermal therapy: Alternating ice applications (for acute inflammation) with heat therapy (for muscle relaxation) works synergistically with TENS treatment. However, never use thermal therapies simultaneously with electrical stimulation.
-
Occupational modifications: Given that occupational factors significantly contribute to back pain burden, ergonomic workplace adjustments and proper lifting techniques are essential long-term strategies.
-
Stress reduction techniques: Chronic stress contributes to muscle tension and pain perception. Mindfulness practices, deep breathing, and progressive muscle relaxation complement the endorphin release encouraged by TENS therapy.
-
Other physical therapists and treatments: Registered massage therapy, acupuncture, chiropractic care, and physiotherapy can work synergistically with DR-HO'S advanced stimulation technology. These hands-on approaches complement our 4-in-1 technology's nerve and muscle stimulation, creating a comprehensive pain management strategy that addresses both mechanical and neurological aspects of lower back pain.
When should you see a doctor about back pain?
While a TENS unit provides valuable pain management support, certain symptoms demand urgent professional evaluation:
-
Emergency symptoms include:
-
Severe pain following trauma or injury
-
Pain accompanied by fever, indicating possible infection
-
Progressive neurological symptoms: numbness, tingling, or weakness in legs
-
Loss of bladder or bowel control (cauda equina syndrome)
-
Severe pain that worsens progressively despite conservative treatment
-
Chronic pain red flags include:
-
Persistent pain significantly impacting daily function or quality of life
-
Night pain that disrupts sleep patterns
-
Pain associated with unexplained weight loss
-
Morning stiffness lasting over one hour
DR-HO'S commitment to advancing pain management technology through our revolutionary 4-in-1 system represents a grounded approach to addressing the global back pain epidemic. As the prevalence of lower back pain continues to rise globally, having access to advanced, scientifically validated pain management tools becomes increasingly crucial for maintaining quality of life and functional independence.
Our innovative approach to nerve and muscle interaction, combined with evidence-based complementary strategies, offers hope for millions seeking effective, non-invasive pain management solutions that work harmoniously with the body's natural healing processes.
Disclaimer: DR-HO'S content is intended for informational purposes only and should not be taken as medical advice. Please consult a certified medical professional for diagnosis and treatment recommendations.
View the Full DR-HO'S TENS Pad Placement Series!
1. DR-HO'S Pad Placement Charts
2. DR-HO'S Pad Placement Guide: Knee, Ankle & Foot Pain
3. DR-HO'S Pad Placement Guide: Back, Hip & Leg Pain
4. DR-HO'S Pad Placement Guide: Neck & Shoulder Pain
5. DR-HO'S Pad Placement Guide: Carpal-Tunnel-Related Pain
6. DR-HO'S Pad Placement Guide: Back Pain
7. DR-HO'S Pad Placement Guide: Elbow, Wrist & Hand Pain


